Showing posts with label tips. Show all posts

Wednesday, October 2, 2013

The Red Wall

As I'm editing wedding photos, I just came across one simple tip.  Try not to have someone facing a red wall/train/shirt...it causes their face to be red.  Yes, you can edit it out but it's a lot easier to just not deal with it.  They can have their back to it no problem, it's when they are facing it as you can see in Derek's face on the left.  The orange/red train makes his face a lot more red than it would be naturally. 
                               {Left side: unedited}                                            {Right side: edited out red face}

Friday, September 2, 2011

10 Tips for Height Differences

Last weekend I had a session where the couple differed in height by over a foot. What are some things to remember in this case?

1. If you are photographing someone tall, it's often better to try to get a bit higher than them...especially if you are just 5'6":)
2. Have the couple sitting. This helps to equalize things a bit and get their heads closer together naturally.
3. Make sure that when looking up at the taller individual, that the shorter one does it more with their eyes rather than their whole head. Otherwise, there will be a lot of shots of just pure neck.
4. Instead of just `regular' kissing, a kiss on the forehead is cute:)
5. Have the shorter person walk in front and lead the other.
6. Find natural spots where there is a height differential and use it (stairs, sidewalk and curb, roots next to the tree etc). Did I mention stairs???


7. Tilting the camera for an angled shot.
8. Picking the other person up!
9. Stagger them.
10. Finally, heels.

Let me know if you think of something else!

Sunday, August 21, 2011

Kid Tips

Being that I do lot of family sessions, there are a bunch of things to help make it easier on kids (and parents and you!).

First off, I have no problem with parents bribing their kids:) Secondly, if they are young, I will forego the most important time for lighting and instead, use a time where the kiddos are better behaved (ex. not around nap time!).

Here are some other ways to get kids to love you/the camera:
1. Get to know their name right away.

2. Let them know they will do a few smiley faces and then they get to do their silliest faces! And be prepared, after the funny face often comes the most sincere smiles!
3. Let them see their photos after you take a bunch.
4. Find out what they love and get them to shout that out or you can make the sound. I have choo chooed and barked and neighed and who knows what else. A lot of little ones love singing. I have the WORST voice in the world but somehow, `Happy birthday' can do that trick without sounding too terrible! Make sure the parents don't sing along if they are in the photos.

5. If they are not wanting to look at the camera, just get some candids following them around. Or, get them interacting with mom and dad...those are the best smiles!

6. Let them choose the spot they want their photo taken at, sometimes they pick really good ones!
{Noah picked this great spot!}

There's are just a few off the top of my head. Do you have any others?

Monday, February 22, 2010

White Balance

White balance is the way your camera reads light temperature and colour. Most people just often leave it on AWB (automatic white balance) but you can (and should!) change it indoors, with flash etc. You know when your indoor pictures of people have that yellow/orange tinge? That is why. If you look on your camera for the white balance settings they have cloudy, flash, fluorescent lighting, custom, etc.
The picture above was shot in RAW so I could adjust the white balance in post production. LOVE IT. Shooting in RAW is the greatest change I ever made to my photography but I won't talk about that right now.
This picture is fine but you can see that it was shot with an automatic white balance giving her face an orange/pink/yellow hue.
So find that white balance button on your camera and change it for the situation you find yourself in. See what kind of difference it can make....especially indoors.


Thursday, February 11, 2010

So You Have a DSLR, Now What?

So many people have told me that they have a nice camera but they don't really know how to use it. They just use the automatic settings and let it do all the work. Wouldn't it be fun if you knew how to use all of the buttons and dials?! Wouldn't it be fun if they flash didn't automatically pop up?

Gary would have different advice so I will do my advice today and then do a part II with his advice:)

There are 3 things that I think are very important to know.
1. ISO. This is equivalent to the old film that you used to put in your camera. Remember? You used 100 when you were shooting outside or where there was a lot of light. You used 800 when shooting in the dark. Same as ISO, you need to increase your ISO in darker situations. Yes, your picture will have more noise (look grainier) but you will actually see your subject.

2. Aperture. This is the amount of light that is let in. When people talk about f stops, that is what they are talking about. The smaller the number, the larger the aperture (more light let in). Our 50mm lens goes all the way to f/1.4 which is awesome. I usually shoot with a really high aperture and this also gives the look of the subject in focus and the background being blurry. If you want everything in focus, you will want a lower aperture (higher f stop).

3. Shutter speed. This is related to ISO and aperture. You generally want a fast shutter speed or your subject will be blurry. So, to increase you shutter speed, you need to probably crank your ISO up a bit and increase your aperture. You generally want a shutter speed of around 1/125th or faster.

So, take your camera out of auto mode and turn the dial to `AV' or aperture priority. Take pictures at various ISO's and apertures. Note the shutter speeds that you get. If the shutter speed is too slow (ex 1/40th), then increase your ISO or increase your aperture (make it a smaller number). Let me know how it goes!

Tuesday, December 29, 2009

Blue Sky

Just a quick one to keep these blog up:) The best way to get blue sky in your pictures is to have the sun behind your (the photographers) back. The only thing is people won't be looking at you because they will be squinting BUT great for candids.

Monday, October 5, 2009

The Lone Hand

I don't really know what to call this, but you know what I mean...when you just see a hand not attached to anything. You want to make sure that you see an arm attached to a hand when possible. Usually, the only time where it's good to have an `detached' hand is when the hand is the focus.

In the top picture, we could've zoomed out and shown her arm attached to her hand (which we did).
In the bottom picture, if we just saw a bit more of the arm on the left side, it would be okay. As for the hand on the bottom right, it just shouldn't be there:)

Sunday, September 6, 2009

Patterns

Oh boy, it's been a while. Here's another basic tip that allows you to get some great photos. I could have a billion examples of patterns here but I'll just show two. There are tons (wow, I like my hyperbole's) of patterns all around you. The shoes of people sitting in a row, spice jars, matchbox cars lined up by your 3 year old son, bouquets held by bridesmaids, items in your fridge door etc. I always like to capture them at an angle, or you can turn your camera to an angle too which I do not do enough. Please note that in the dress picture below, I probably should have cropped the right side because you want the pattern to fill the entire frame.

Cupcakes, rocks, bricks are other great examples. It looks especially good when one particular object (ex. one rock) stands out as it breaks the pattern.

Saturday, August 8, 2009

If It's Not A Hat...

...it shouldn't be on their head. Always pay attention to what may appear to be coming out of your subject's head. Most often it is a telephone pole, tree, or sign coming out of the top of their head. In this case, it looks like some weird finger like growth is coming out of Caden's head. Obviously he's too cute so I kept the picture and you just have to ignore that part:)

I'd search for more examples amongst our millions of pcitures but I think you know what I mean.

Friday, July 31, 2009

Get Down

This picture isn't the best but usually once in a shoot, Gary purposely gets a picture of me taking a picture. I always delete them but I like to see them:) It's really good to try to get pictures at all angles. Stand on a bench and look down, get a shot from a 45 degree angle, from the back....and, get down. Especially if you are taking pictures of kids or babies, it's great to get down at their level. Later on in the shoot we were actually lying on the grass amongst a million mosquitoes.
Can you tell right away what's bad about the picture of the little girl? If you said that the hands holding hers are cut off at the wrist, you are right. Would be better if it was up to their forearms or biceps. Oh well, still a cutie!

Friday, July 24, 2009

Frame It

It's nice to naturally frame the subject using objects such as a buildings, windows, door frames, trellis', trees, mountains, and even other people. And, in my opinion, it doesn't have to surround all the sides to be a frame. I just took the kids to the park, now that is a place with a ton of different frames ready to be used! Here are some examples below.


Look for frames around you, they are everywhere!

Leading Lines

Try to find natural lines such as fences, roads, paths, logs, and one of the most common...rail road tracks. These generally draw your eyes into the photograph. The bottom left picture would be a touch better if they were further down the path.


Sunday, July 19, 2009

The Cut Off

When taking or cropping a picture, leave the joints in the picture. Do not cut off a picture at a wrist, elbow, knee or ankle. It looks wrong. The picture on the left could be salvageable if I crop them at their biceps but the far right is much better as it's cropped at their thighs.

Picture that cut off the ankles and feet are probably one of my greatest pet peeves. Not saying we don't do it, sometimes you're thinking about a billion other things. But ya, leave the joints in the picture!

Friday, July 17, 2009

Rule of Thirds and a Little Extra

Okay, this is one of the most basic tips in photography known as the Rule of Thirds. In case you don't know it, here ya go! Basically, picture your frame broken into 3 X 3 segments for a total of 9 squares. Does that make sense?

You want your main subject(s)/objects to be on one of the vertical and/or the horizontal lines, generally you don't want them right in the center. I realize the tree is in the center but read on. You want your horizon to either fall on the top or bottom third and not directly in the middle of your frame. In the above picture, the grass lines up perfectly with the bottom third and the kids are in the bottom right third (although they were running fast, could've gotten them a bit earlier as they are fast approaching the center!).
Here the girls are standing on the right line and...another tip, there is `space in front of face'. They are looking/facing the left side of the photo. It wouldn't look as good if they were facing the right in this photo.
Here they are on the right third again AND there is `space in front of face'. It draws you in and you follow their eyes to the left. It's just more natural looking too.
Finally, rules are definitely made to be broken. Although, I really try not to mess with the Rule of Thirds in regards to the horizon. When you have a close up of a face, it looks fantastic to have the face centered, AND you will notice that the eyes are generally on the top third line which does follow the rule, just in case you thought you were breaking it.
Happy photographing and rule breaking!

Thursday, July 9, 2009

I've Got Sunshine

Okay, no more song titles after this one. Well, we'll see. No promises.

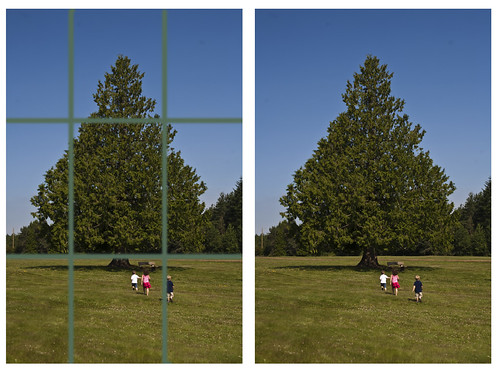
On a bright sunny day (yay, love summer!), either stand in the shade or full sun, but not under a tree that has spots of light coming through it. This will not look good and will make editing way harder (if you are the editing type). Also, if you are taking pictures of a large group, make sure EVERYONE is in the sun or EVERYONE is in the shade. A diffuser is awesome to use, you just need someone to hold it although you can get some with stands too. It works to soften and even the light out.

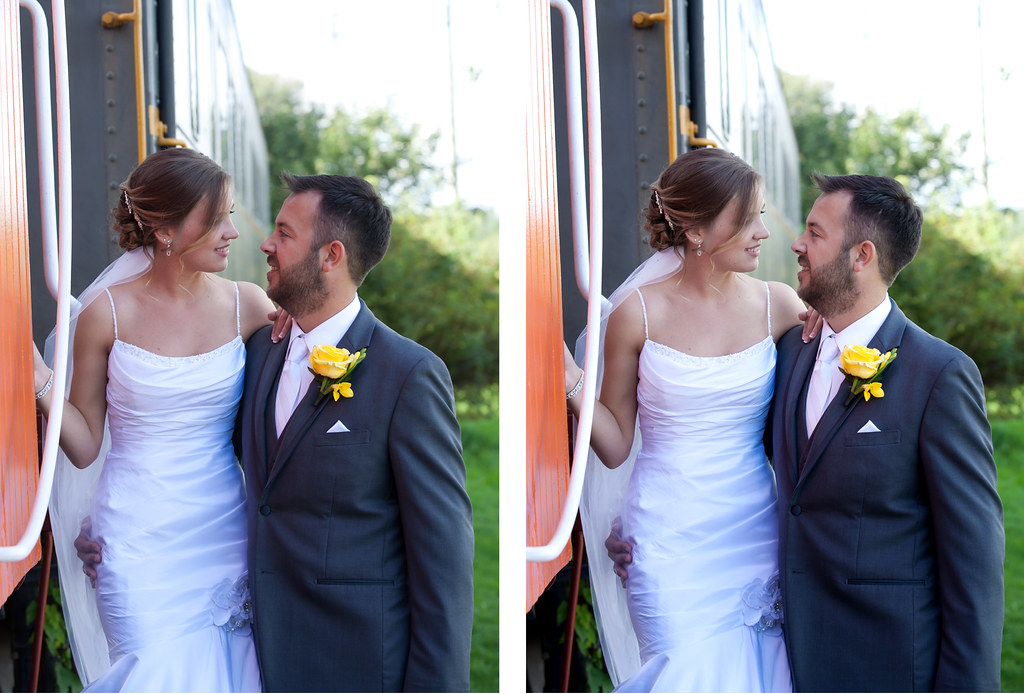
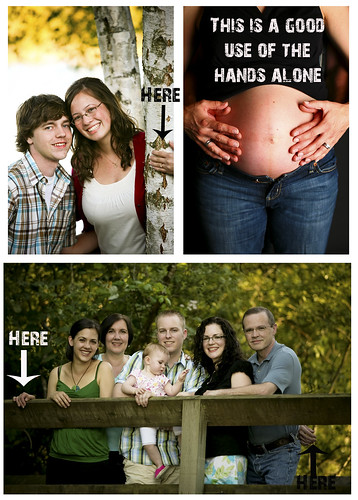
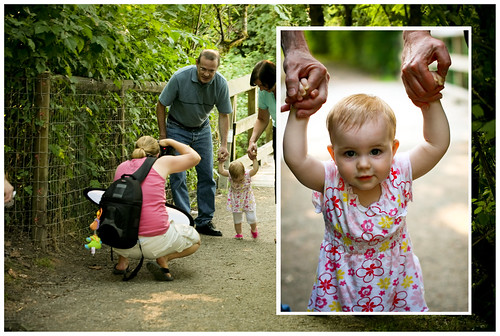
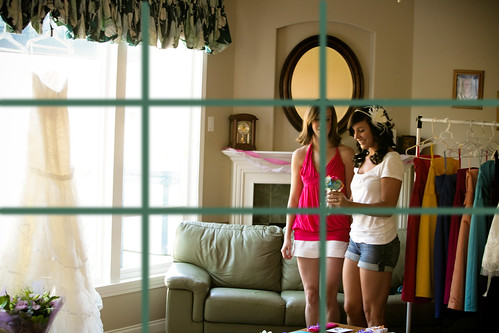
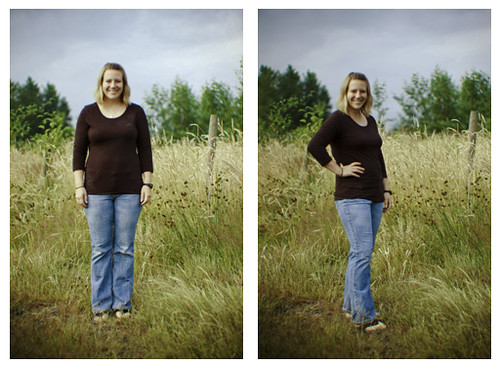
Here is a picture we took using a collapsible diffusing panel in the bright, bright sun. One of these panels is about $30.00 off of Ebay and well worth it if you are doing any wedding photography or you just really, really care about your regular family photos:) We have not used it on our kids as we can't even get them to sit still.

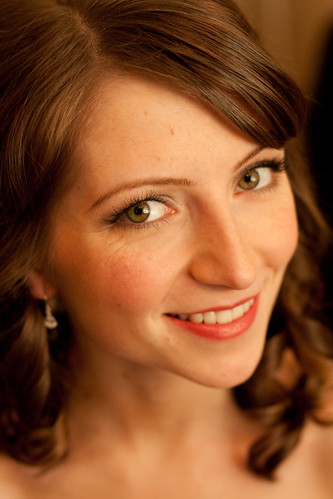
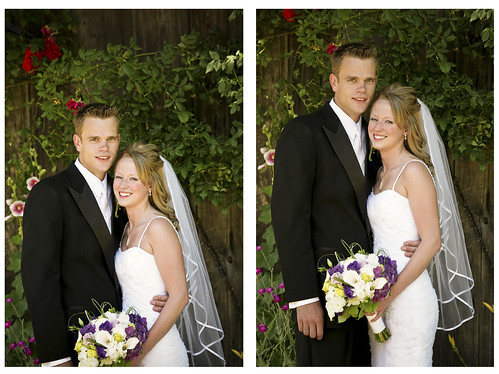
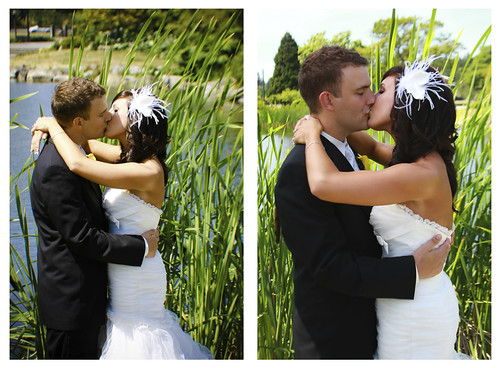
The picture on the left shows what happens without a diffuser. Still a beautiful picture but see the sun light on her forehead and cheek? For the picture on the right, I was holding a diffuser. The downfall is that I am short so I cannot hold the diffuser very high and we may have to get an arm extension or something for it. This means the photo needs to be more of a closeup. Fortunately, my husband is tall so we just switch up who's taking the photos at different times.

We could've turned them so that they were perpendicular to the sun and in full light, but then we would have to change positions and the background would then not be ideal.

We have one that can act as a diffuser or reflector as seen on the link. This is beneficial because you can bounce warm golden light onto faces if they are in the shade.

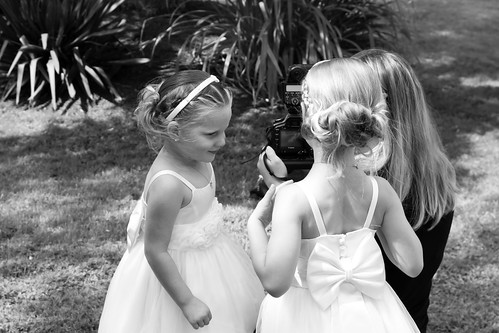
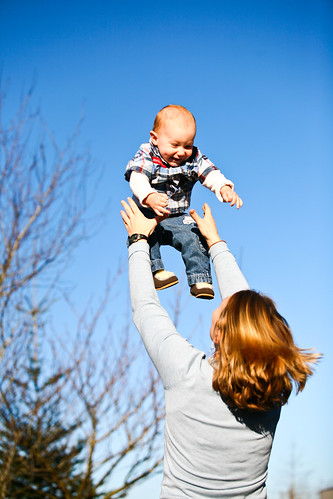
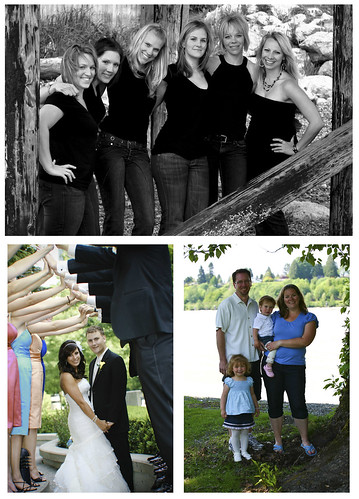
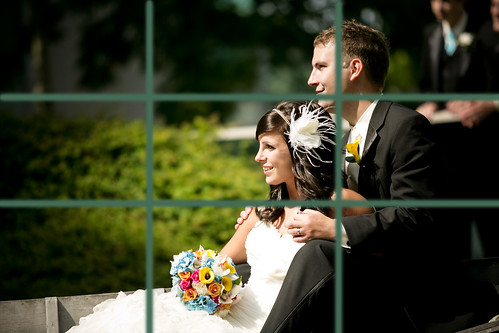
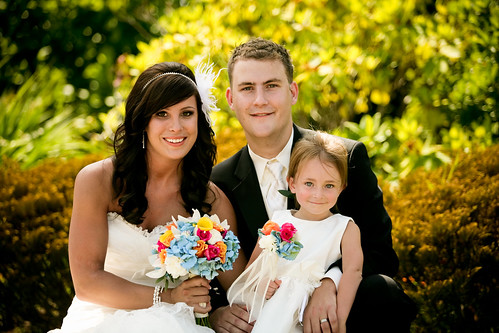
Here's another picture where they were in the bright sun and the only shade was coming through the filtered light of the diffusing panel. Nice. No shadows, soft light.

(Beim shaq, if you are checking this, hope you are okay that I'm posting a picture of your beautiful daughter!)
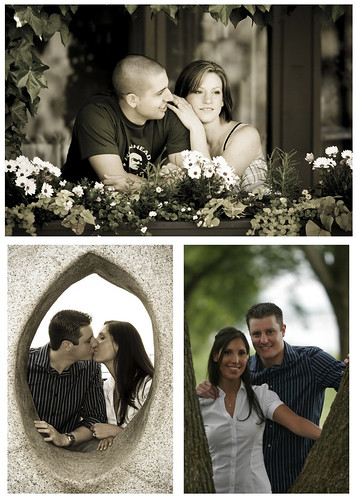
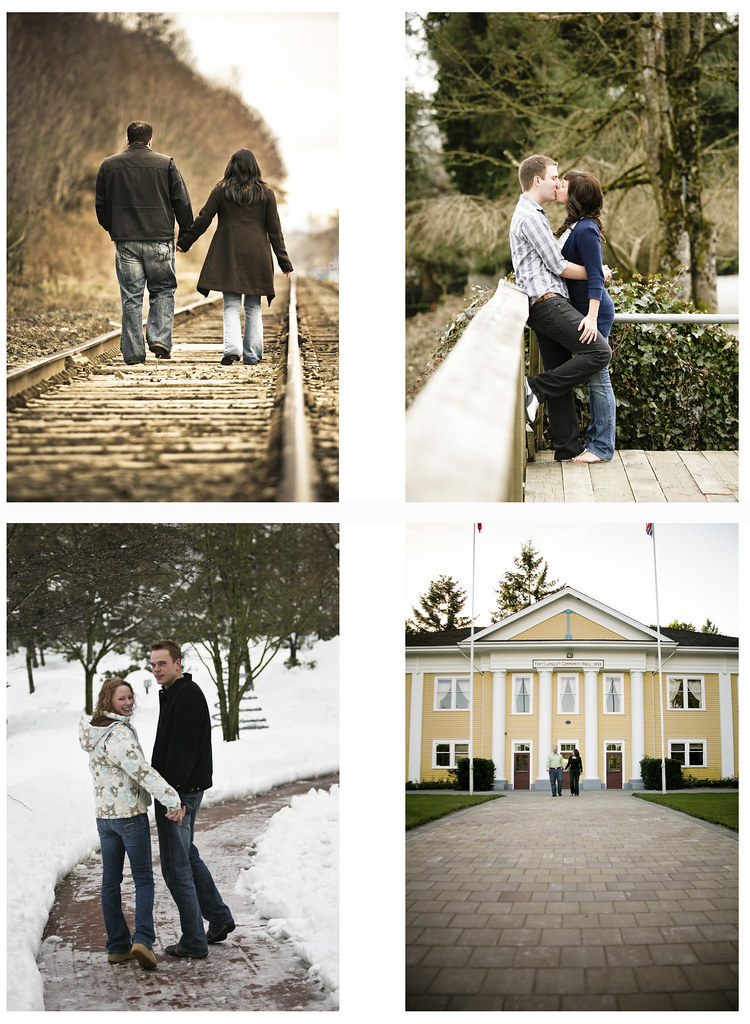
Finally, time of day is soooooo important. Are you still reading? This is the most important part! Obviously with a wedding there isn't much flexibility as most brides don't want to have their photos done at 8am on their wedding day:) The best time is either starting at sunrise or an hour before sunset. You will definitely have a warmer, softer light. Try it. You'll see.

Any other topics you would like me to cover?


Wednesday, July 8, 2009

Hands Up, Baby, Hands Up

A common question I hear from women my age, when photographing them, is `How can I stand so my belly looks a little more flattering?'. If you are thin, these tips apply for a more comfortable look as well. Here are some ideas for when someone says, `Hey, let me take a picture of you!' and you are in a photo by yourself:

1. Do not wear baggy clothing. This doesn't mean skin tight is necessary but find a happy medium. Okay, so you generally can't quickly change your clothes if you find yourself in front of a camera but you know what I mean. For my example photo on the bottom, I think my shirt is too tight. I can see that now. Lesson learned:)

2. Shoulders at an angle (about 45 degrees) NOT facing the photographer straight on.

3. Have one leg in front, closest to the camera, almost pointing at the camera. Your legs should be slightly apart, try to have your thighs not touching yet look natural:)

4. Arm closest to camera should be on hip, in your pocket, up in the air, pointing, or anything you can do to get it a little ways off of the body. Hence, the `Hands Up' title.

If you are getting pictures in a group, make contact with the others. Put your arms around the people beside you. Shoulders, waist, whatever. Get comfy!! No way should there be 2 arms by your side.
Okay, here is an example. I won't make any negative comments about myself. Nope. Won't.
Hopefully you can see that the second one is a lot more flattering and that the first one is AWKWARD!!!
Please leave a comment at some point so I know people are actually reading this:)