Friday, August 10, 2012

Keeping Your Laptop Cool

I do 75% of my editing in Lightroom. It can get pretty slow if you don't have a lot of space or if your fan can't keep up in this hot weather (my computer even shut down a few times in the heat while editing away). After having the fan cleaned, I bought this Notebook Cooler that goes under the laptop and it has made such a difference! It was just $30 US and with shipping came to about $50. Totally worth it! The fan even cools me as I'm working:)

Thursday, May 31, 2012

10 Tips For Photographing Your Newborn

I will say right away that I am not a newborn photography expert. I generally do more lifestyle type photos with mom and dad interacting with the baby. Let's say you don't want to hire someone for a newborn session but you still want some good photos of your baby, here are just a few simple tips to use in your own in your home:

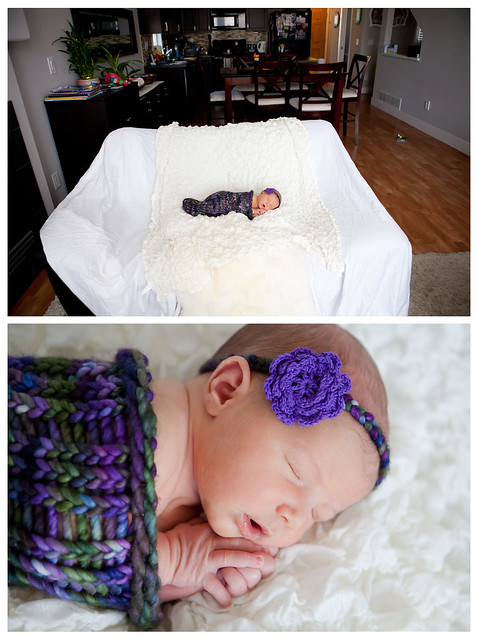
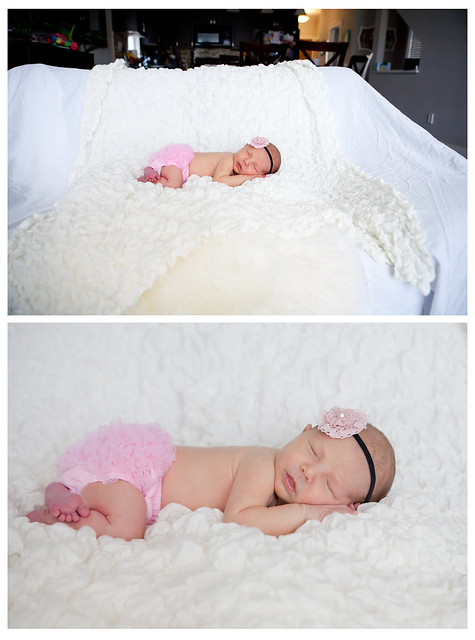
1. You do not need any fancy studio lights or flashes. I just had her lying on a couch in front of our big living room window.

2. Use blankets as a backdrop that are lighter or neutral in colour. If you use brighter colours, it really can make the skin tone a lot more difficult to edit. Babies are often really pink or yellow or orange as it is:) Have the blanket go up over the couch or if on another surface, have it pinned to a couple of chairs behind the baby. You don't want anything other than the blanket as the backdrop or it's distracting.
3. Make sure baby is safe. This it THE most important thing. When you see shots of babies hanging from branches or having their heads rested in their hands, there is some photoshop going on. Hands are supporting the baby. Do not attempt anything unsafe. Ever. I don't do these shots because I'm not trained in them. Never leave baby unattended. Even a baby that has never rolled before, can roll at that moment.

4. The best time to do photos is after the baby has had a good feed. If you try to do it while they are still hungry, you'll get a lot of funny faces and their hands in their mouth:)

5. To keep baby happy, have the room nice and warm (crank the heaters!) and white noise is always good too.

6. Tuck in hands and feet. When they are splayed everywhere, the baby looks really uncomfortable. It's good to hold their body all nice and tucked in with a blanket and wait for the baby to get comfortable in that pose and then slowly remove the blanket. It takes patience!! Put hands under the head to hold it up off of the blanket.

7. If you have toddlers running around, want that `perfect' newborn shot, want to be in the shot, or are too exhausted to even think of taking photos, you can always hire someone too!

8. You can have them naked (beware and be prepared for a mess!) or use a diaper cover. Cloth diapers can be fine but I think that the look of a disposable diaper takes away from the photo.

9. The best time to do newborn photos would be in the first 10 days or so. The photos above were done on day 4.

10. Take photos. No matter what they look like, just take them. They are only little once and they grow so, so quickly. You don't want to forget their newborn hair, their hands, their feet etc. My baby is already 1 week old and I feel like she's getting too big already:)

Tuesday, May 15, 2012

Wedding Day Timeline

One thing that I find really makes me feel confident on the wedding day is having a detailed timeline in place. I usually go over the general timeline with the couple when I talk to them at the engagement session so that they know how to time their ceremony and reception appropriately. Most people have never thought about how much time is needed for everything and how the day really works. You can't be shooting family photos in the dark and expect them to be good. You also don't want to be with the bride from the moment she wakes up as that would be the longest day in the world:)

I'm sure every wedding photographer is a bit different but this is what our day generally looks like:

1. Bride getting ready photos (1.5 hours)
-usually I come towards the end of the hair and makeup and also get shots of all of the details and just the bridesmaids doing their thing. The bride getting into the dress, putting on jewelry etc is always key!

2. Guys getting ready photos (0.5 hours)
-guys really don't take much time getting ready, just getting their suits on and at the church/ceremony location you can get the boutonniere shots.

3. Ceremony (1.5 hours)
-a ceremony isn't 1.5 hours long but we get there early to make sure we've got our lighting figured out and get the shots of the ushers/guest book attendees, details etc. Also, there is generally a receiving line afterwards and some of those first few in the receiving line provide great shots.

4. Portraits (1.5 hours)
-we set aside 1.5 hours for photos of the wedding party and the couple. This does not include driving time. We usually recommend just one location with some diversity. Also, it's important to have snacks and water along. This sounds silly but a bride who has been nervous all morning often forgets to take care of herself this way:) Also, it is important that everyone knows where they are going and how to get there etc! These photos can always be done before the ceremony too but then I think it's good to have 10 minutes set aside for the `First Look'. This is definitely the most tiring part of the day as your mind is constantly observing everything and you need to be very efficient.

5. Family photos (20 minutes)
-this is usually best either right after the ceremony or right before the reception. I don't usually love doing it right after the ceremony at the ceremony location as there are generally 20 other cameras around. A list is important here as some people just want immediate family and others want every uncle, aunt and cousin etc. Good to know how much time to set aside here. Also, so important for all family to know exactly where to go and when to be there.

6. Reception (3-4 hours)
-Gary does this portion and gets the details, speeches, first dance, garter and bouquet toss, cutting the cake etc.

I believe in making sure the day runs smoothly as much as in your control. You don't want your couple showing up late to the ceremony or reception because of you! You also don't want to tire out the entire wedding party just because you want to try one more location. Some wedding couples are good with less photos and others could keep going longer...you need to make sure you are getting feedback from them.

Have a wonderful week!
Love, Louise

Thursday, May 10, 2012

Shtuff People Say To Photographers

Here is something I saw today on you tube called `Shtuff People Say To Photographers'. It made me laugh:)

To me, the most common thing I hear is `You'll just photoshop that out right?' Yes, one magical click and you will have no zits, wrinkles, and you'll lose 20lbs. No problem.

Tuesday, May 1, 2012

Shooting in Low Light Without Flash

This past weekend we photographed a wedding at this gorgeous church; Canadian Memorial Church.
There was not a lot of light inside and they have a `no flash' rule. So, what did we do?

1. Arrive early. We were able to walk around and test the light available in various parts of the church. We tried out several options to see what would work best during the ceremony.


2. One of the options that worked was having the 70-200mm lens set up on a tripod in the back of the church. This shot, above, was taken at just 1/13th shutter speed (ISO 1000 f/2.8). Hand held, I always like my shutter speed above 1/80th. Just my preference:)


3. What worked best? Our prime lenses! I was able to shoot the wedding using the 85mm f/1.8 and I wasn't sad at all that I couldn't use my external flash to bounce in some light. Gary used the 50mm f/1.4.

Another option that we did have along was the monopod (provides stability for the lower shutter speeds) but it does make it tough to move around and get the shots you want/need.

Overall, such a gorgeous church for a wedding ceremony and I'm thankful for a variety of lenses!

Sunday, March 4, 2012

3 Tips for Pregnant Photographers

Being that I'm 6 months pregnant, I've had to make a few adaptations to how I do things photography wise. Here are three tips:

1. I realized when shooting a wedding last weekend that baby does not like a huge camera (with battery pack) resting on her head. I switched to our Black Rapid shoulder strap and all was well. As a side note, Gary uses two shoulder straps during receptions so both cameras are ready to go, and seriously, it's really comfortable. The only time I do not like using the dual straps with two cameras is when I'm low down to the ground a lot because a camera gets bumped around. Although, being pretty big right now, there's not a whole lot of crouching down going on.
{Photo taken from Teamworkphoto.com}

2. When editing, it can be really hard on your body/belly/butt to sit at a chair. I use an exercise ball. So much better!
3. How much to work when pregnant? I've realized that it is best to book about 25-50% of what you normally would. Baby and momma come first:) First trimester you often feel sick, second you could be dealing with some lovely sciatica, and third? Well, bring on the fatigue. You don't want to be working hard with a `baby brain' (you know, when you're really forgetful and your brain is functioning at about 75% or less):) Better to do less but put a more effort/energy into those sessions. Also, holding the equipment and getting into your regular positions (climbing, squatting etc) is a lot harder on your body and can leave you feeling sore for a whole lot longer. Take care of yourself!

Just my thoughts:) Now we'll have to wait a few more months and see what I have to say about how much to work with a newborn! I am taking one month off of everything and then in the second month I will be doing some editing (Gary will do 2 weddings with another second shooter) and then in month 3, I should be back at it. That's the plan, we'll see how it goes!

Monday, February 27, 2012

Shooting in the Cold


Here's a great accessory for taking photos in the cold; Lululemon gloves. The tips of the pointer finger and thumb can be easily slipped over your fingers which allow you to turn knobs yet keep your hands from freezing. I love them! I think they are actually meant to control your iPod but it works wonderfully with your camera too!
{The other thing to remember when shooting in the cold is that your battery will drain way faster! When I climbed Mt. Kilimanjaro, I hiked with my camera batteries tucked under almost all of my clothes.}

Sunday, February 5, 2012

What Do You Shoot In?

This poll was taken from Digital Photography School with over 72,000 people (mostly photographers, I'm assuming) participating. I personally shoot Aperture Priority (AV on your dial) all the time except when doing studio stuff, then I use Manual. If you have a DSLR and haven't made your way out of automatic, I really, really encourage you to. Learn about what aperture, ISO, and shutter speed mean, and how to adjust them, and you can make the most out of any lighting situation.
camera-shooting-modes.png